Custom Lint Task Configuration in Gradle with Kotlin DSL

October 7, 2024
Here we are with a cool example of how you can create Lint rules to control visibility between layers in a project based on Clean Architecture! In this structure, each layer has its own role: domain, data, and presentation shouldn’t be gossiping between each other more than necessary.
Why do we need these rules? Because sometimes, in large projects, the temptation to mix dependencies between layers is real. And if we allow the domain package to start depending on data or presentation, we’re breaking the sacred rules of Clean Architecture. That would be like having the brain (domain) directly connected to the muscles (presentation) or the veins (data) without going through the proper nerves. Madness!
With these Lint rules , we’re basically telling our code, “Hey, domain! No peeking at data or presentation!” It’s kind of like being the guardian of best practices, making sure only the right layers are communicating with each other.
What if we use modules?
Now, heads up: if instead of dividing your code into packages within a single module, you’re using separate modules for each layer (domain, data, presentation), you wouldn’t need all these custom rules! Modules already have their own magic for handling dependencies. They manage who can access what on their own, so you won’t have to worry about manually controlling visibility. But if you’re using packages within the same module, these rules are your best friend for keeping your code clean and organized.
So, in summary, these Lint rules are like setting boundaries for the packages within a single module, making sure domain, data, and presentation stay in their lane, fulfilling their role without poking around where they shouldn’t.
With that said… Let’s get down to business!!!
We’ll start by configuring Lint in an Android project using Gradle with Kotlin DSL (.gradle.kts), and we’ll do it step by step, with examples and custom rules included. Let’s dive in! 💪
🎯 Step 1: Configure the Lint Task inbuild.gradle.kts
First, let’s dive straight into the build.gradle.kts file, where we’ll define the Lint task and customize its reports—because let’s be honest, nobody likes sticking with the default report, right?
plugins {
    id("java-library")
    id("com.android.lint")
    alias(libs.plugins.jetbrains.kotlin.jvm)
}

lint {
    htmlReport = true
    htmlOutput = file("lint-report.html") // Archivo de reporte HTML
    textReport = true // También generará un reporte en texto
    checkReleaseBuilds = true // Verifica las compilaciones de release
    absolutePaths = false // Usa rutas relativas en los reportes
    ignoreTestSources = false // Incluye los test en los reportes
    abortOnError = true // Detiene el proceso si hay errores
}

java {
    sourceCompatibility = JavaVersion.VERSION_22
    targetCompatibility = JavaVersion.VERSION_22
}

dependencies {
    compileOnly(libs.lint.api)
    compileOnly(libs.lint.cli)
    compileOnly(libs.lint.checks)
    compileOnly(libs.lint.tests)
}

tasks.jar {
    manifest {
        attributes(
            "Lint-Registry-v2" to "com.example.custom_lint.CleanArchitectureIssueRegistry",
            "Lint-Vendor" to "The Roustic Chicken" // Reemplaza con el nombre de tu empresa
        )
    }
}
🎉 And done! Now you’ve got your build.gradle.kts file configured. Your Lint task is fully equipped to generate reports in HTML and text format, verify release builds, and more.
🔍 A Deep Dive into build.gradle.kts
1.Customize Lint to your liking
This is where we configure how we want Lint to behave. We’ll control the types of reports, whether we verify release builds, how errors are handled, and more.
lint {
    htmlReport = true
    htmlOutput = file("lint-report.html") // Archivo de reporte HTML
    textReport = true // También generará un reporte en texto
    checkReleaseBuilds = true // Verifica las compilaciones de release
    absolutePaths = false // Usa rutas relativas en los reportes
    ignoreTestSources = true // Tests en los reportes
    abortOnError = true // Detiene el proceso si hay errores
}
-
htmlReport = true: We want a visually friendly report in HTML format. The report will look nice, with colors and everything.
-
htmlOutput = file("lint-report.html"): Here, we define where we want the HTML report to appear. In this case, it will be saved in the "lint-report.html" file.
-
textReport = true: Just in case, we also generate a plain text report because it’s always good to have a simpler option
-
checkReleaseBuilds = true: We want Lint to be stricter with our release builds. No bugs should sneak into the final version.
-
absolutePaths = false: To avoid displaying full file paths in our reports, we use relative paths. That way, we don’t share more information than necessary.
-
ignoreTestSources = true: Tests matter! But this time, these rules don't apply to them.
-
abortOnError = true: Are there serious errors? Lint will stop everything. We don’t move forward until they’re resolved.
1.3. Adding Lint Dependencies
Time for dependencies! This is where we specify which Lint libraries we need for our custom rules.
dependencies {
    compileOnly(libs.lint.api)
    compileOnly(libs.lint.cli)
    compileOnly(libs.lint.checks)
    compileOnly(libs.lint.tests)
}
-
libs.lint.api: This dependency allows us to write our own Lint rules.
-
libs.lint.cli: Gives us access to the Lint command line interface to run our rules.
-
libs.lint.checks: Includes standard Lint rules to check our code.
-
libs.lint.tests: Provides useful tools to test our custom rules.
1.4. Customize the JAR and Manifest
Finally, we configure the jar task to add a couple of details to the manifest, such as registering the custom rules we are going to define.
tasks.jar {
    manifest {
        attributes(
            "Lint-Registry-v2" to "com.example.custom\_lint.CleanArchitectureIssueRegistry",
            "Lint-Vendor" to "The Roustic Chicken" // Reemplaza con el nombre de tu empresa
        )
    }
}
-
Lint-Registry-v2: Here we specify where Lint can find the custom rules, in this case in CleanArchitectureIssueRegistry.
-
Lint-Vendor: Customizes the name of the rule provider, which in this example we've called "The Roustic Chicken" or as I like to say, “El Pollo Campero”. Change this to your company's or project's name.
And with this, you have configured the Lint task in build.gradle.kts. Ready to catch any architectural errors or dependency violations that might slip through. Here’s to cleaner code!
🛠️ Step 2: Implement Custom Lint Rules
¡Now comes the magic! ✨ We’re going to write some custom Lint rules. Here, I’ll show you how to ensure that our beloved domain package doesn’t have unwanted dependencies on data or presentation.
Rule:DomainDependencyDetector
This little rule will monitor to ensure that the domain package stays pure and doesn’t depend on other data or presentation packages, because Clean Architecture demands it. 🤘
package com.example.custom_lint

import com.android.tools.lint.detector.api.*
import org.jetbrains.uast.UClass
import org.jetbrains.uast.getContainingUFile

class DomainDependencyDetector : Detector(), SourceCodeScanner {

    override fun applicableSuperClasses(): List<String>? =
        listOf("java.lang.Object")

    override fun visitClass(context: JavaContext, declaration: UClass) {
        val uFile = declaration.getContainingUFile()
        val packageName = uFile?.packageName ?: return

        val regexDomain = Regex("""^com\.example(?:\.home)?\.domain(?:\.\w+)*$""")

        if (regexDomain.matches(packageName)) {
            val imports = context.uastFile?.imports ?: return

            for (importStatement in imports) {
                val import = importStatement.asSourceString()
                val regexData = Regex("""^import\s+com\.example(?:\.\w+)?\.data(?:\.\w+)*""")
                val regexPresentation = Regex("""^import\s+com\.example(?:\.\w+)?\.presentation(?:\.\w+)*""")

                if (regexData.matches(import) || regexPresentation.matches(import)) {
                    context.report(
                        ISSUE, declaration,
                        context.getLocation(importStatement),
                        "El paquete domain no debe depender de data o presentation."
                    )
                }
            }
        }
    }

    companion object {
        val ISSUE: Issue = Issue.create(
            id = "ImportDependencyViolation",
            briefDescription = "Import Dependency Violation",
            explanation = "Ensures that imports comply with architectural rules.",
            category = Category.CUSTOM_LINT_CHECKS,
            priority = 6,
            severity = Severity.ERROR,
            implementation = Implementation(
                DomainDependencyDetector::class.java,
                Scope.JAVA_FILE_SCOPE
            )
        )
    }
}
🧩 What’s Happening Here?
1- Package Verification: The rule checks that the current package is part of domain.
2- Import Check: If an import from data or presentation is detected in the domain package, the alarm goes off 🚨.
3- Error Reporting: If something suspicious is found, the issue is reported with a clear message: "The domain package should not depend on data or presentation."
And voilà, you’ve implemented your first custom Lint rule. Wasn’t that difficult? 😊
🔍 A Deep Dive into DomainDependencyDetector
The DomainDependencyDetector rule aims to ensure that the domain package doesn’t depend on other packages, specifically data or presentation, thereby respecting the principles of Clean Architecture. Let’s see how it does this and how we use a regular expression to identify problematic packages
General Structure of DomainDependencyDetector
The detector extends Detector and implements the SourceCodeScanner interface. This allows it to scan source classes for patterns or rule violations. The key to this detector is reviewing imports in files within the domain package and checking if any depend on data or presentation.
How It Works Step by Step:
1. Applicable Superclasses:
override fun applicableSuperClasses(): List<String>? = listOf("java.lang.Object")
Here we specify that this rule applies to classes that extend java.lang.Object, which is practically any class in Java. This ensures that all classes in the project are analyzed.
2. Obtaining the Package and Regular Expression (Regex):
val uFile = declaration.getContainingUFile()
val packageName = uFile?.packageName ?: return

val regexDomain = Regex("""^com\.example(?:\.home)?\.domain(?:\.\w+)*$""")
First, we obtain the package name of the current class using getContainingUFile(). This gives us the source file (UFile), from which we then extract the package name.
Next, we define the regular expression regexDomain, which will check if the file belongs to the domain package. Let’s break down the regular expression:
-
^com\.example: Matches a package starting with com.example.
-
(?:\.home)?: This is a non-capturing group that indicates .home is optional. This is useful if you have multiple variants of the domain package, such as com.example.domain or com.example.home.domain.
-
\.domain: Ensures the package contains .domain
-
(?:\.\w+)*: This part allows for sub-packages within domain, such as com.example.domain.usecase, by permitting any number of subdirectories with \w+ (representing a sequence of letters, numbers, or underscores).
This expression ensures that the rules are applied only if the file is within the domain package.
3. Verification of Imports:
val imports = context.uastFile?.imports ?: return
for (importStatement in imports) {
val import = importStatement.asSourceString()
val regexData = Regex("""^import\s+com\.example(?:\.\w+)?\.data(?:\.\w+)*""")
val regexPresentation = Regex("""^import\s+com\.example(?:\.\w+)?
\.presentation(?:\.\w+)*""")
Now that we know we’re in the domain package, it’s time to review all the imports in this file. Here, we define two new regular expressions: regexData and regexPresentation, which check if anything from the data or presentation packages is being imported.
-
regexData: Looks for imports from the data package. The expression com\.example(?:\.\w+)?\.data allows the import to come from any variant of the data package, such as com.example.data or com.example.submodule.data.
-
regexPresentation: Similar to the above, but searches for any imports coming from the presentation package.
if (regexData.matches(import) || regexPresentation.matches(import)) {
    context.report(
        ISSUE, declaration,
        context.getLocation(importStatement),
        "El paquete domain no debe depender de data o presentation."
    )
}
If any import matches regexData or regexPresentation, we report the error using context.report. Here, we specify the issue, its location, and a clear message indicating that the domain package should not depend on data or presentation.
In summary, this rule ensures that the domain package remains independent and "pure," adhering to the Clean Architecture principle that seeks a clear separation of responsibilities between the layers of the application.
🛠️ Rest of the Rules
Si eres un perfeccionista (como todos los buenos desarrolladores 😉), probablemente querrás crear más reglas para otros paquetes. No te preocupes, también te cubro aquí:
Rule: DataDependencyDetector
package com.example.custom_lint

class DataDependencyDetector : Detector(), SourceCodeScanner {

    override fun visitClass(context: JavaContext, declaration: UClass) {
        val packageName = declaration.getContainingUFile()?.packageName ?: return
        val regexData = Regex("""^com\.example(?:\.home)?\.data(?:\.\w+)*$""")

        if (regexData.matches(packageName)) {
            val imports = context.uastFile?.imports ?: return

            for (importStatement in imports) {
                val regexPresentation = Regex("""^import\s+com\.example(?:\.\w+)?\.presentation(?:\.\w+)*""")
                if (regexPresentation.matches(importStatement.asSourceString())) {
                    context.report(
                        ISSUE, declaration,
                        context.getLocation(importStatement),
                        "El paquete data no debe depender de presentation."
                    )
                }
            }
        }
    }

    companion object {
        val ISSUE: Issue = Issue.create(
            id = "DataDependency",
            briefDescription = "Dependencia prohibida en Data",
            explanation = "El paquete data no debe depender de presentation.",
            category = Category.CORRECTNESS,
            priority = 6,
            severity = Severity.ERROR,
            implementation = Implementation(
                DataDependencyDetector::class.java,
                Scope.JAVA_FILE_SCOPE
            )
        )
    }
}
Rule: PresentationDependencyDetector
package com.example.custom_lint

class PresentationDependencyDetector : Detector(), SourceCodeScanner {

    override fun visitClass(context: JavaContext, declaration: UClass) {
        val packageName = declaration.getContainingUFile()?.packageName ?: return
        val regexPresentation = Regex("""^com\.example(?:\.home)?\.presentation(?:\.\w+)*$""")

        if (regexPresentation.matches(packageName)) {
            val imports = context.uastFile?.imports ?: return

            for (importStatement in imports) {
                val regexData = Regex("""^import\s+com\.example(?:\.\w+)?\.data(?:\.\w+)*""")
                if (regexData.matches(importStatement.asSourceString())) {
                    context.report(
                        ISSUE, declaration,
                        context.getLocation(importStatement),
                        "El paquete presentation no debe depender de data."
                    )
                }
            }
        }
    }

    companion object {
        val ISSUE: Issue = Issue.create(
            id = "PresentationDependency",
            briefDescription = "Dependencia prohibida en Presentation",
            explanation = "El paquete presentation no debe depender de data.",
            category = Category.CORRECTNESS,
            priority = 6,
            severity = Severity.ERROR,
            implementation = Implementation(
                PresentationDependencyDetector::class.java,
                Scope.JAVA_FILE_SCOPE
            )
        )
    }
}
🧩Step 3: Register Rules in IssueRegistry
Finally, it’s time to register all these wonderful rules in a single IssueRegistry.
package com.example.custom_lint

class CleanArchitectureIssueRegistry : IssueRegistry() {
    override val issues = listOf(
        DomainDependencyDetector.ISSUE,
        DataDependencyDetector.ISSUE,
        PresentationDependencyDetector.ISSUE
    )
    override val api = CURRENT_API
    override val vendor: Vendor = Vendor("The Country Chicken")
}
🔗Diving into Registering Rules in IssueRegistry
To ensure our custom rules are used by Lint, we need to register them. This is where the CleanArchitectureIssueRegistry class comes into play, acting as the "catalog" for our custom rules. Let’s see how it works and why it’s important.
Key Elements:
1. The List of Issues:
override val issues = listOf(
    DomainDependencyDetector.ISSUE,
    DataDependencyDetector.ISSUE,
    PresentationDependencyDetector.ISSUE
)
The issues property is a list containing all the Lint rules we want to register. Each rule has a static Issue, such as DomainDependencyDetector.ISSUE, which defines the problem we’re looking for (and how it will be reported).
Here, we register three detectors:
- DomainDependencyDetector: Ensures that the domain package does not depend on data or presentation.
- DataDependencyDetector: Similar to the above, but checks that the data package does not depend on presentation.
- PresentationDependencyDetector: Ensures that presentation does not depend on data.
By including these three detectors in the list of issues, Lint will know to execute these rules when analyzing the code.
2. Lint API:
override val api = CURRENT_API
This value tells Lint which version of the Lint API we are using. The value CURRENT_API ensures that we are using the latest version compatible with the system.
3. Vendor Information:
override val vendor: Vendor = Vendor("The Country Chicken")
The vendor field allows you to define a name that identifies who created these custom rules. This is useful if multiple individuals or teams are creating custom rules within the same organization.
🤔 Why Do We Need the IssueRegistry?
The IssueRegistry is the bridge between Lint and our custom rules. Without it, Lint wouldn’t know which rules to apply. Additionally, it allows Lint to integrate these rules into the standard analysis flow of any project using our rule library.
When Lint runs, it looks for classes that extend IssueRegistry to get the list of all rules that need to be executed. Registering your rules in IssueRegistry is a crucial step to ensure they are active during static code analysis.
What Happens When Lint Runs?
When Lint is executed (whether manually or as part of a build process), it goes through the following stages:
1- Loading the Registry: It looks for all classes extending IssueRegistry.
2- Registering Rules: Loads the rules listed in the issues property.
3- Running Analysis: Analyzes the source code using the registered rules.
4- Reporting Issues:If any rule detects a violation, Lint generates a report (in HTML, text, etc.), highlighting the problems found.
Thanks to the CleanArchitectureIssueRegistry, our rules are automatically executed every time Lint runs, ensuring that the code adheres to the defined architecture.
One Last Step!
We need to include our custom Lint rules in the build.gradle of all modules where we want them to apply. To do this, simply add the following line to the dependencies section of the corresponding module:
dependencies {
    lintChecks(project(":custom_lint"))
}
And now, to test it! Open the Android Studio terminal and type:
./gradlew lint
This command will run Lint and analyze all the files. If there are any violations of our rules, the errors will appear in the terminal, and reports will be generated in .txt and .html formats with all the details.
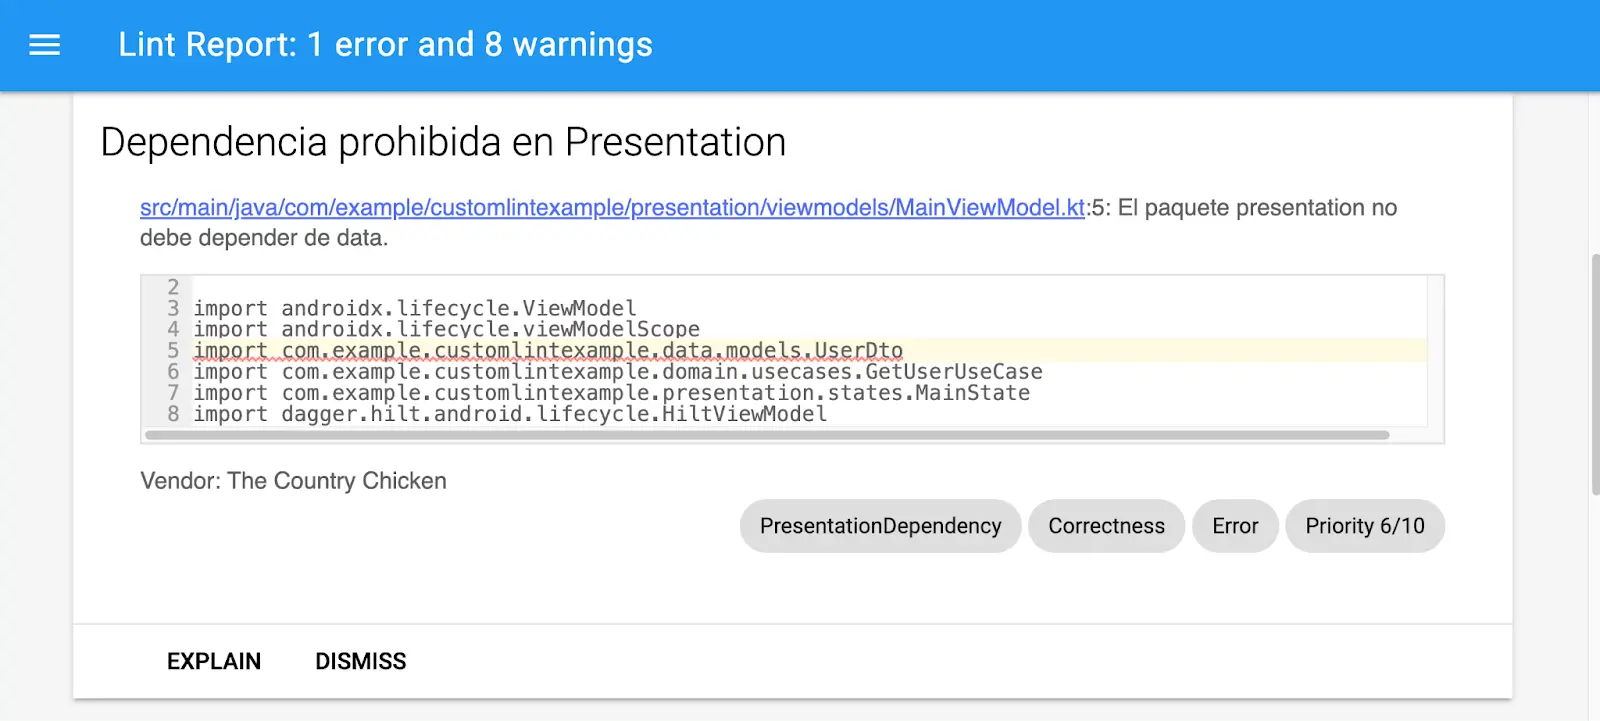
To see it in action, we’ve provided a test project on GitHub where you can experiment with the rules we’ve created. If you want to force an error and see how it works, just go to MainViewModel and, within the init method, create an instance of UserDto. Since UserDto belongs to the data layer and MainViewModel belongs to the presentation layer, our architecture rules will immediately throw an error. It’s perfect for seeing how Lint alerts you to such violations!
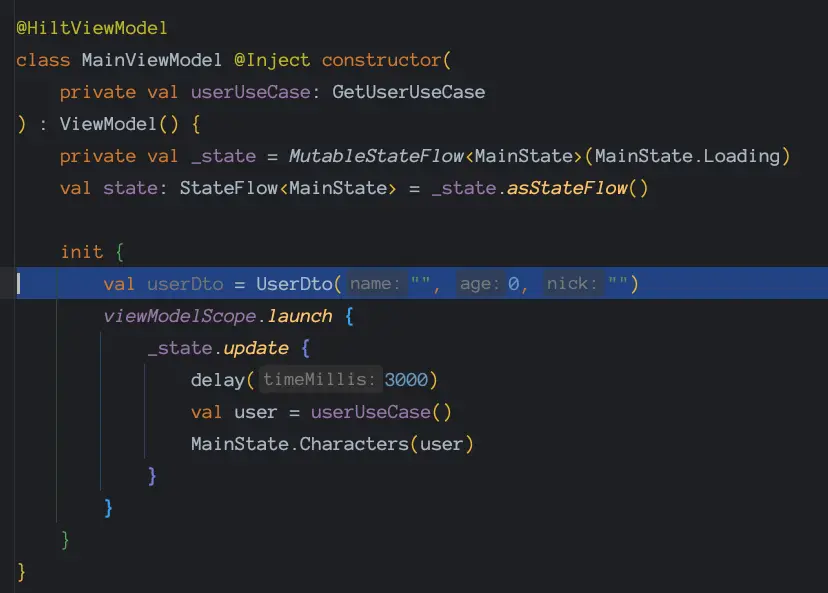 We force the error by creating an obj from the data layer in the presentation layer.
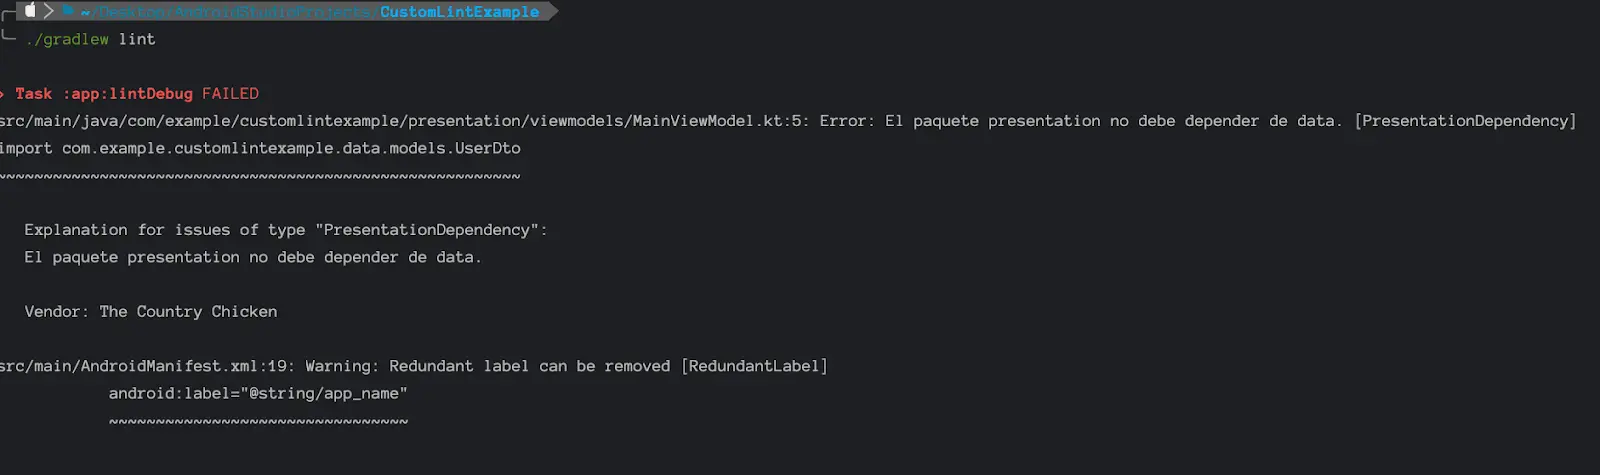 We run the Lint task, and the error is displayed
 The paths where the reports are located are displayed.
 The paths to where the reports are located are displayed.
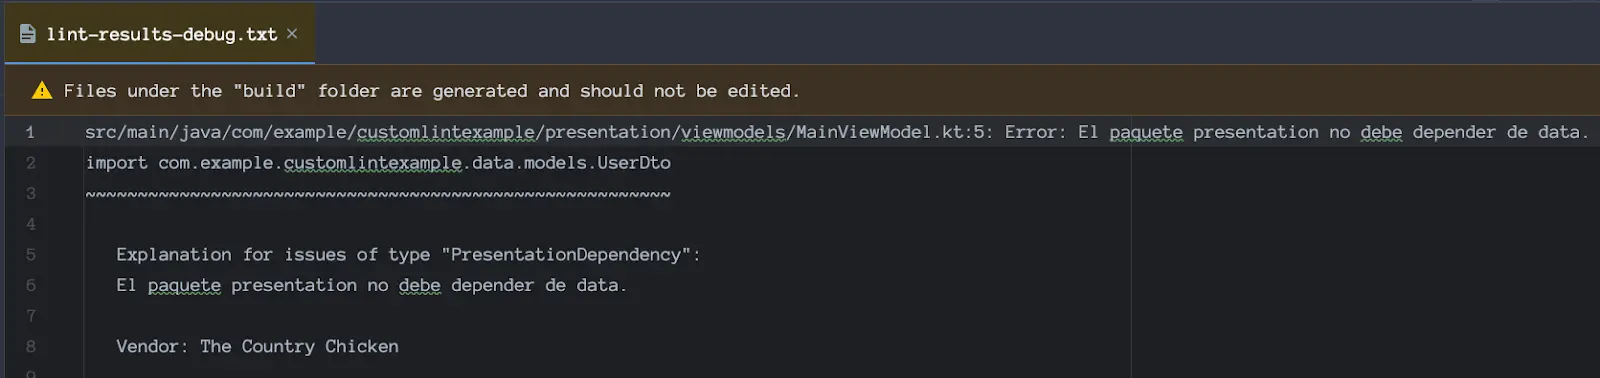 Plain text error report.
 HTML format error report.
Improvements
😅 Let's be honest, running the ./gradlew lint command every time you want to check if your code adheres to the rules can be a bit… inconvenient. You’re in the middle of development, adjusting details, and having to keep returning to the terminal isn’t the most streamlined process.
But don’t worry! There are ways to automate this and make Lint work without you having to lift a finger. For example:
- Run Lint every time you make a commit: This ensures that your code complies with the rules before pushing any changes.
- Run Lint every time you compile or run the project: By creating a couple of tasks, you can integrate Lint directly into your daily workflow.
But… that’s a story for another time, which we’ll cover in more detail in a future article. Stay tuned because it will make your life much easier! 😉
And that’s it, folks! We hope this journey through Lint rules and Clean Architecture has been as interesting as it is useful (and a bit fun, right?). Now, your layers are more protected than ever, and your code will thank you with fewer errors and more clarity.
See you in the next article, where we’ll continue unraveling the mysteries of development! Until then…
May the spirit of Pollo Campero be with you 🐔!
Our latest news
Interested in learning more about how we are constantly adapting to the new digital frontier?

Tech Insight
January 13, 2025
How to bring your application closer to everyone

Tech Insight
December 19, 2024
Contract Testing with Pact - The final cheetsheet

Insight
December 18, 2024
Agility, Complexity and Empirical Method

Tech Insight
December 17, 2024
Google’s new quantum processor is here, but what does it really mean?